
PRACTICAL GUIDE · AI VIDEOS
How to enter your favorite movie with AI
I always wanted to be Sandy from Grease. I used my photos and Higgsfield Genjutsu to put myself into the scenes. In this guide, you will learn how to adapt the process to the character and movie you choose.
By Marcela Batista · AI Videos · Guide + prompts · 7 min read ·
The result of my example
This is the final video I posted, with an intro, a comparison and an outro. It is an edited demonstration: what you upload to Genjutsu is only the original movie clip. The Portuguese and English subtitles are already part of the video image.
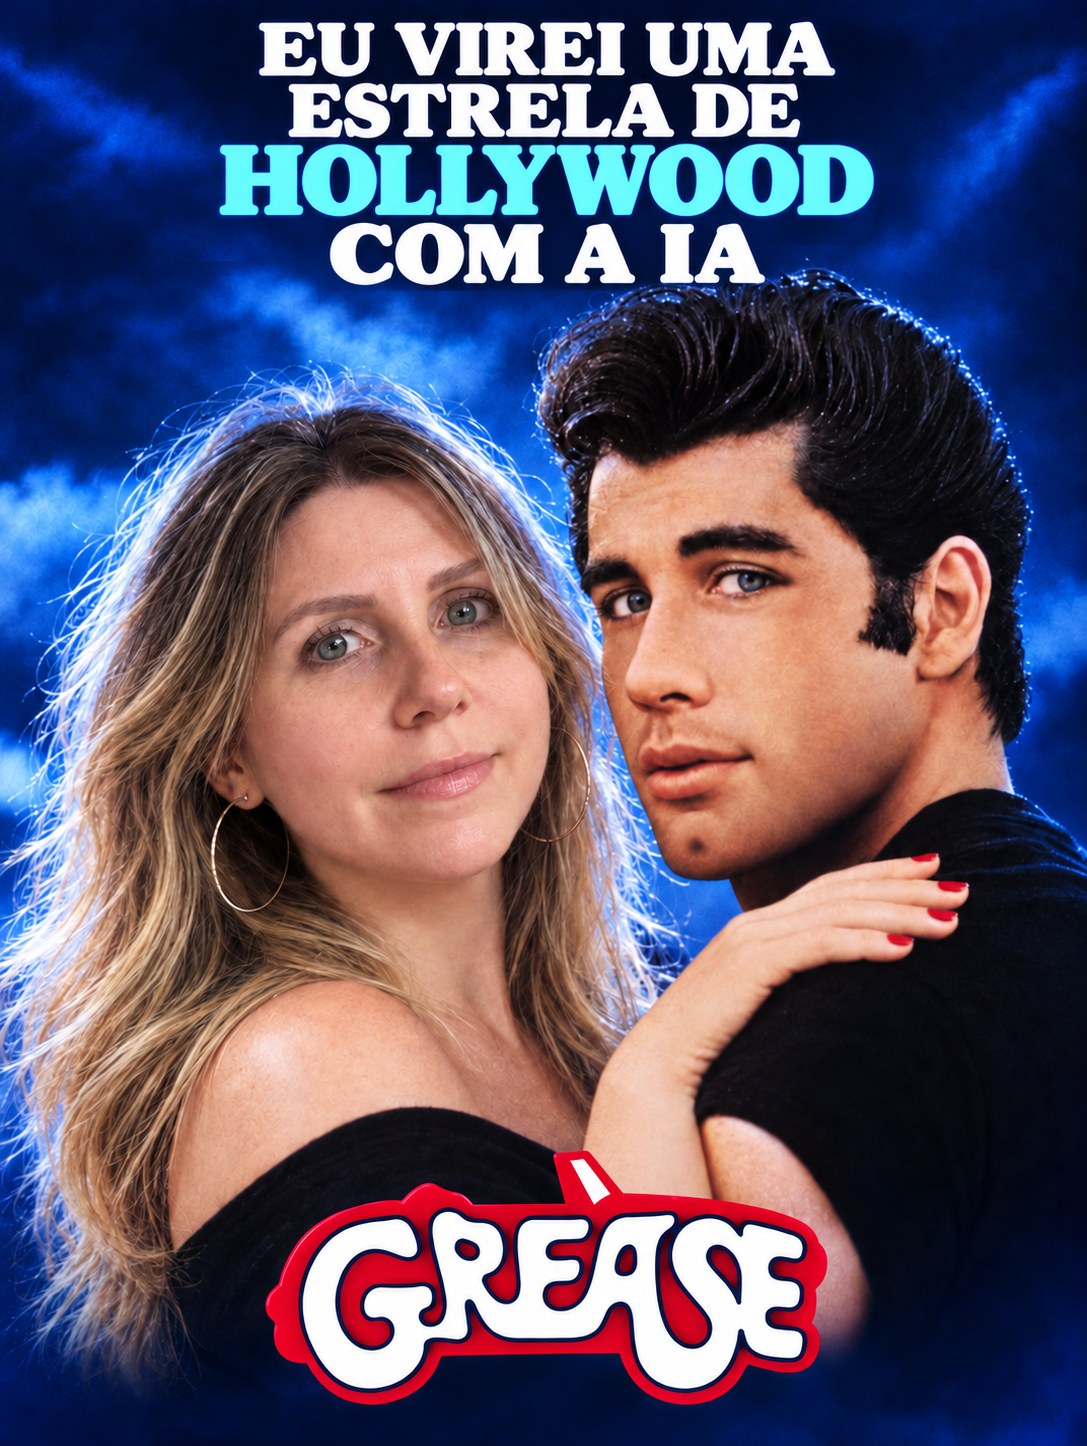
A practical note: results vary with the scene, the lighting and the photos. Watch the whole video and check the frames carefully before posting.
1. Choose a short scene
Start with a 4 to 10 second clip from the movie you already have saved. Prefer a scene where the character's face is clearly visible, with few fast head turns and few things passing in front of them.
Use one scene per attempt. Before you start, note how to identify the chosen character: clothing, hair color and where they are in the frame. This description goes into the prompt.
The movie clip is the source material. The narrated video you saw above is only the final demonstration, after editing.
2. Gather your reference photos
Choose a real, sharp photo of your face, from the front, in natural light and without filters. Three-quarter and full-body photos are optional. Your real photos are the main reference for your face.
You can start with a single image of yourself already dressed as the character. The suggested combination is: Image1 with you dressed as the character, Image2 with your real front-facing photo and, if you like, Image3 full body.
More images do not automatically improve the result. Use photos of the same person, with consistent hair and look. An AI-generated full-body image can show the look you want, but it does not document your real proportions.
3. Create a character image
In ChatGPT or another image editor, upload your photos and a frame from the chosen scene. Use the prompt below, replacing [CHARACTER] and [MOVIE].
Check the likeness before moving on to video. The goal is to keep the character's costume with your own features and age, preserving your hair color and length and adapting only the hairstyle.
Access the prompts and the download
Register your name and email once to unlock the prompts in this browser. If you already registered here, your access will be recognized automatically.
Access the prompts4. Set up Genjutsu
Go to higgsfield.ai and open Genjutsu. Select Motion transfer mode, as in the screenshots from my example. Upload the movie clip and, with the + button, the reference images you chose.
Check the labels the tool assigns to each file. In my case they were @Video1, @Image1 and @Image2 (the chips may show a space, as in @Video 1). The prompt must use exactly the labels of your uploads.
The screenshots below show the interface on October 9, 2026, and it may change. The credit amounts shown in them, 56 and 70, are examples from that moment, not guaranteed prices.
The official Genjutsu documentation describes a different mode, Objects swap. The limits listed there do not automatically apply to Motion transfer. The 4 to 10 second suggestion is my own, for a first test.
| Label | What to upload | Required? |
|---|---|---|
| @Video1 | The movie clip with the chosen character | Yes |
| @Image1 | Your image dressed as the character | Yes |
| @Image2 | Your real front-facing photo, for the face | Recommended |
| @Image3 | Your full-body photo | Optional |
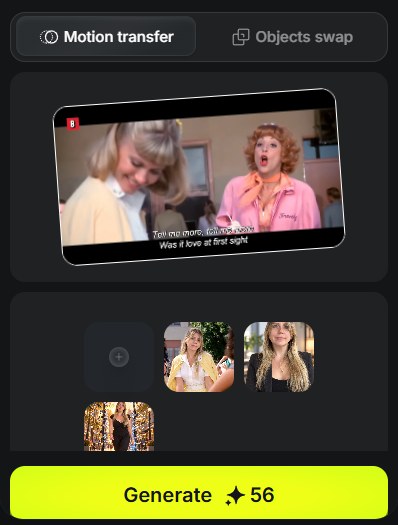
First screenshot: mode, source video, references and generate button.
- Motion transfer mode selected (not Objects swap).
- Movie clip uploaded as the source video.
- Reference photos added with the + button.
- Generate button, with the credit cost at that moment.
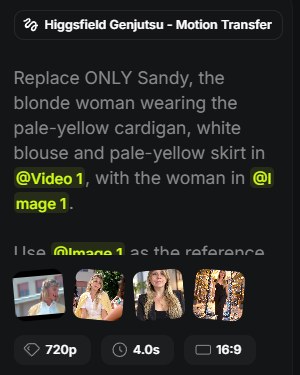
Still from the first screenshot: the prompt and settings of a finished generation.
- Mode used for the generation.
- Selective prompt: replaces only the described character.
- References used.
- Resolution, duration and format of that generation.
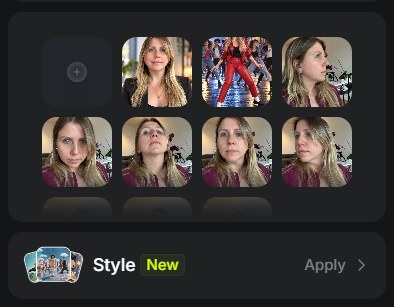
Second screenshot: several uploaded references and the optional Style field.
- + button to add references.
- Reference photos. More photos do not guarantee a better result.
- Style is optional. To keep the look of the film, apply no style.
5. Write the video prompt
The prompt is in English in both versions of this guide, because that is what I used. There is no rule that English works better; feel free to adapt it.
In short, it asks: replace only the described character with me; use Image1 for appearance and costume and Image2 for the face; keep the original costume and my hair color and length; follow the character's movements, expressions and timing; leave the other people, setting, camera, cuts and timing unchanged; and add nothing.
The second screenshot shows a prompt asking to replace all the characters. Do not use that one: it replaces everyone. To step into one person's place, use the selective prompt below.
- Replace [CHARACTER NAME AND VISUAL DESCRIPTION] with the character's name plus a description of their clothing and position. Example: the woman in the yellow cardigan on the left.
- If you uploaded only Image1, delete the sentence starting with Use @Image2.
- If you uploaded a full-body photo as Image3, add this sentence:
- The labels in the prompt must match the ones shown on your uploads.
Access the prompts and the download
Register your name and email once to unlock the prompts in this browser. If you already registered here, your access will be recognized automatically.
Access the prompts6. Configure and generate
Leave Style without an additional style: to keep the look of the film, it is not needed.
Check the credit cost shown on the Generate button before clicking. If 720p is available, it is a good choice for a first test. Then click Generate.
Generation time and cost can vary, and the tool is not free by default.
7. Review the result
Watch the whole video and check: facial likeness, hair, movement, the other people, the background, the cuts and the audio.
If the original audio changes, keep or restore the movie's sound in editing. Combine separate clips only after approving each one.
Asking to preserve the scene does not guarantee every pixel stays the same. That is why frame-by-frame review matters.
If something does not turn out as expected
- The face does not look like me
- Use a sharper front-facing photo or an approved character image.
- It replaced the wrong person
- Describe the character more precisely: clothing, hair and position in the frame.
- The image drifts over time
- Use a shorter clip and do not apply an additional style.
8. Choose your movie
Now it is your turn: choose your favorite scene, gather your photos and save this guide to follow step by step.

A word from the founder
Technology is more fun when it fulfills an old wish.
This project came from a childhood wish. Experimenting carefully, reviewing attentively and using your own image responsibly are part of the process.
Marcela Batista · Founder & CEO, Morieli
Talk to MorieliWhat do you want to make possible with artificial intelligence?
At Morieli, we start by understanding the context and the problem that deserves attention. From there, we connect strategy, software and artificial intelligence to build useful solutions.